Powered by Blogger.

Pages

Thursday, February 28, 2019

Support and Resistance

Support and Resistance has always been the biggest attribute of technical analysis. It is used by a huge majority of traders in the markets, from the big banks, large trading companies, right down to the small retail traders. It is also the most basic technical analysis pattern where you can find where supply and demand meet.

Basically, it is used to refer to price levels on a chart, preventing the price from getting pushed in a certain direction. As we discuss in our guide to using price action and technical analysis, knowledge about the use of support and resistance plays a big role in identifying potential long and short trading opportunities. 

What is Support and Resistance? 


Support is a level at which demand is thought to be strong enough to pause the price from declining. As the price of a security drops and gets cheaper, buyers will tend to buy more and sellers will be less inclined to sell, thus forming a support line.  
Support levels are usually below the price, but it can still trade at or near support. 
On the other hand, resistance provides potential trade entry or exit points. It is a level in which it is thought to be strong enough to pause the price from rising. As the price of a security towards resistance, sellers will tend to sell more and buyers will be less inclined to buy. 
Resistance levels are usually above the price, but it can still trade at or near resistance.  
A trader will trade on a price and determines if it is correct. As the price moves in the right direction, the position may gain you profit. As the price moves in the wrong path, a small loss is expected and the position can be closed. 
 

Trend lines

Understanding the trending and trend lines is very important when learning about support and resistance.

Resistance levels are formed as the price action begins to slow down and starts to pull back towards the trend line. Traders will pay close attention to the price of a security if it falls toward support of the trend line for the reason that it has prevented the price of the asset from moving lower. 


Support and Resistance Zone


Support zones refer to a price zone in which a security's price has fallen to a predicted low. The support zone typically occurs around trend lines. On the other hand, the resistance zone is where a stock finds resistance and begins a downward trade. The zone of resistance will more likely occur if the higher volume of trading in the zone of resistance.
 

Identifying Support and Resistance 

As mentioned above, when a market moves up and makes a pullback, the highest point of the pullback is called a resistance. If the market continues upward, its lowest point reached before it started is now what you call support. But how can you actually identify them? There are three ways to identify Support and Resistance. 


'Psych' Levels 

Psychological levels occur when the price ends with multiple 0's. For example, when traders think about what the price will be worth in the future. If the given price is 1.2250, then a trader will more likely round off the price to something simpler, like 1.2300 or 1.2200. The most common psych levels involve price having two zeros at its end (1/10th of a pip is not included), such as 2.2100 or 127.00. The more powerful psych levels end with three 0's, like 3.4000 or 340.00. 


Swing Highs and Lows 

Another way of finding support and resistance levels is to find past levels and mark each where price had difficulty breaking through. Each level that price has bounced off could be a level in the future that tends to bounce off again. This method takes time as it requires you to mark levels on all of your currency pairs. In the long run, it can make you great profits. 
 

Pivot Points 

The use of pivot points is to determine directional movement and potential support and resistance levels. It uses the period's high, low, and close to determine future support and resistance levels. Without a doubt, this is one of the easiest support and resistance levels to use. 

How to Use Support and Resistance? 

Here is an example of support switching roles with resistance.
The idea here is if price is moving between support and resistance levels, then the best thing to do is to buy at support and sell at resistance. 
If you are a day trader and use support and resistance to help find entries and exits, then the price interval period should be short-term, such as 1 minute time frame.

If you are a long-term trader, then use price charts based on hourly, daily, weekly, or monthly interval periods.  It is important to remember that you choose a chart based on price intervals that align with your trading strategy. 

How to Trade Support and Resistance? 

Support and Resistance can be traded using the following techniques: 
 

Support and Resistance Bounce 

As its name suggests, the goal of this technique is to capture the rebound. What this strategy does is tell you if the price does not break the support or resistance.

Many traders make errors on setting their orders directly on support and resistance levels. When you are using the bounce, you probably want to make the odds come in your favor and find some confirmation of a hold of support or resistance. 
Example: instead of buying immediately, you might want to wait for bounce first before you enter. 
 
If you are going to go short, wait for it to bounce off a resistance level before you enter. 
 
With the help of this technique, greater profitability awaits. The bounce helps you avoid moments where price moves fast and breaks support and resistance levels. 

Support and Resistance Break 

You can play support and resistance breaks in two ways. Either the easy way, or the hard way.  
 

The Easy Way 

Instead of entering on the break, wait for a price pullback to the support and resistance level and enter after the price bounces.

The Hard Way 

The best way to play breakouts is to buy or sell whenever the price passes through the zone. What you want to do is enter when price passes through a support or resistance level. 

Recap 

Support and Resistance levels are one of the key attributes of technical analysis. Many traders from all walks of trading use it as part of their trading handbook.

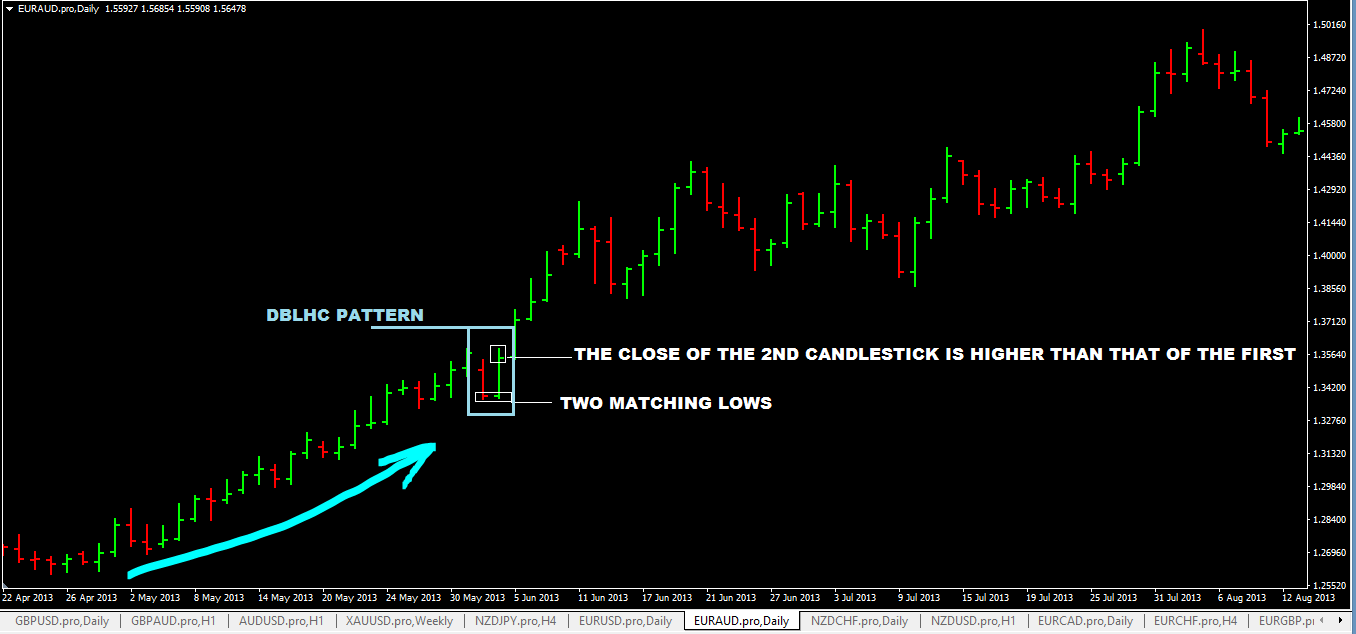
A lot of traders also use the major Japanese candlestick patterns to let them know when price is going to break or hold, and if, or when they should enter a trade.
There are different methods of choosing when to look for support and resistance levels, but its interpretation is still the same. It is an advantage for you as a trader to become an expert at marking them.

Volume Candlesticks – See How to Trade with this Powerful Indicator

What are Volume Candlesticks?

If you are looking for information on volume candlesticks, then congratulations on the next evolution of your trading journey. What I mean by this is that you have gone beyond basic analysis and are doing deeper research.
Well in this post we will cover the topic of volume candlesticks from which you can make the determination if this charting style is a possible fit for you.

Structure of Volume Candlesticks

Volume candlesticks are comprised of the following information: open, high, low, close and volume. The one difference from the standard candlestick structure is the volume aspect. The volume then drives the size of the width of the candlestick.

Examples of Volume Candlesticks on the Chart

Volume Candlesticks
Volume Candlesticks
What are some of the things that pop out at you when reviewing the above chart?
First, the large size of the candlesticks in the morning. This is something you will consistently see when day trading.
The other thing to note is how you can have small candles right after large ones. These inside bars are moments of reflection where bulls and bears are trying to figure out which way the action will break.
The last thing you will notice is how volume slowly drifted lower into the close the prior day.

Breakouts with Volume Candlesticks

Breakouts are one of the hardest patterns to trade in the market, but they are also one of the most rewarding in terms of profit potential. The key challenge with breakouts is determining when the breakout is real versus when it's just professional traders selling into the hands of other less informed retail traders.
Let's review a few examples of breakouts and how volume candlesticks can help us dissect the action.

Breakout Example #1

In this first example, we are going to review a breakout to the downside.
Valid Breakdown
Valid Breakdown
In the above chart, notice how when price breaks down, it is followed by red candlesticks that are also large. If the second candlestick after the breakout candle was small and unable to go lower, this is your first sign that a reversal or at least a pause could be around the corner.
Let's take a look at another valid breakout example.

Breakout Example #2

One of the hardest things to do when day trading is placing trades during the middle of the day. The head fakes are just everywhere once you get past 10 - 10:30. The breakout momentum from the opening bell has dissipated and moves higher are often where the newbies are stuck holding shares from professionals that have sold off into the strength.
Midday Breakout
Midday Breakout
Let me first say it is very rare for the midday or late in the day breakout to occur with more volume than the morning. So, don't expect these huge volume candlesticks that somehow dwarf the morning trades.
Not saying it can't happen, it's just rare.
Back to the example, notice how the candle breaks through with a solid white candle after about ten smaller back and forth candlesticks.
This large white candle shows you that price was able to hold and do so with volume. This gives you validation that you just need to wait for the price to exceed the high of this large candlestick for you to open a long position.
Unlike the morning trade where you can buy breakouts almost purely based on price action because you know the volume always comes in, you will need to obsess over volume from the midday to increase the odds of your trades working out.

False Breakouts with Volume Candlesticks

Failed Breakouts
Failed Breakouts
As you can see the volume and price do not accompany the breakout. Again as mentioned earlier, with the midday breakouts you have to be patient and let that first 5-minute bar develop.
The method is simple: if the candle is red on the breakout and the width is small, there is likely a possible reversal in play. At this point, your alarms should be going off and shifting from profit to protection.

Trend Continuation with Volume Candlesticks

Another method for using volume candlesticks is to determine when to enter continuation patterns. This is a great method for jumping on a strong trend.

Pullback/Continuation Example

Pullback Volume Candlestick
In this example, FRC had a nice runup in the morning and then formed a doji.  As you can see the doji was small relative to the large white candle from the morning that it was testing.
So, how do we set up the trade?
Well, the doji also presents itself after four black crows (I know the candles are red). You want to buy the break of the last red candle with a stop below the doji.
Your profit target is the most recent high, which will give you a 3 to 1 risk reward ratio. Check out the below visual which illustrates this setup.
Pullback Setup - Volume Candlestick

Ride the Trend with Volume Candlesticks

I have yet to figure this one out.
Let's explore how volume candlesticks can potentially help identify when the market is trending hard and when you need to hold on to your position for larger gains.
Riding the Trend
Riding the Trend
In this example, you can see that there are some up candles and when red candles do present themselves, they do so with little volume.
In these scenarios, you want to sit back and let the candles do the hard lifting. We don't receive a large red candle until near the close, at which point you have already made a sizeable profit.
Strong Uptrend
Strong Uptrend
The market continues to go higher in this next example with a few red candlesticks. Again, the key point is that there are no large candlesticks showing up on the chart.
The one point I want to call out is that a large red candlestick can always show up out of nowhere.
So, you need to keep stops beneath key price levels to ensure you don't give back gains in minutes that you have been accumulating all day riding a strong wave.

Saturday, February 23, 2019

#1:Double Bar Low Higher Close (DBLHC) Strategy

The DBLHC is a 2 bar pattern.
The first and the second bar should have matching lows or lows that are within two pips of each other.
In other words, their lows are almost on the same price level.
Now the 2nd bar is the most important bar. This bar must close higher than the high of the first bar.
Once these conditions are satisfied, you have a DBLHC price pattern.
The DBLHC is a bullish pattern. When you see this pattern, you should be looking to buy.


Here’s what a DBLHC pattern looks like:

Tuesday, February 12, 2019

Should A Trader Measure Profits In Percentages, Pips Or Risk/Reward (R)?


Today’s article is about a seemingly obvious concept; how to measure trading profits. Yet, most traders start out measuring their profit (and loss) totally wrong, but it’s really not their fault. Conventional thinking and what is typically spread on the internet or recommended by brokers and even in many books, just isn’t how actual professional traders think about measuring trading performance or managing risk (they go hand-in-hand).
Hence, today, I want to give you a real-world lesson which is probably not what you have read or heard elsewhere, on how to properly measure your trading performance and risk in the market. After all, this is a pretty core-component to your trading career, and if you don’t have this part down how can you expect to actually make money in the market? I think you agree.
As you know if you’ve followed my blog for any length of time, I am primarily a swing trader and that is the style of trading we focus on here and that I teach my students. Why is that important? Well, because depending on how you are trading, you will want to measure your profits differently, and for swing traders like you and I, there is one way to measure profits that is clearly more logical and simply “better” than the rest.
However, before we get into how I measure risk and reward as I trade the markets, let’s be fair and transparent and go over the three primary ways traders measure this. We will discuss each of them and then I will explain which one most professional traders focus on, and why.

The 3 Primary Means of Measuring Profits:

  • The “2%” Method – A trader picks a percentage of their account to risk per trade (usually 2 or 3%) and sticks with that risk percentage no matter what. The basic idea here is that as a trader wins, they will gradually increase their position size in a natural way relative to account size. However, what usually happens is traders lose (for a number of reasons discussed in my other articles, check out this lesson on why traders fail for more), and then they are stuck trading smaller and smaller position sizes due to the 2% rule (the 2% means less money risked as you lose), making it harder just to get back to their starting amount, let alone actually make money!
  • Measuring Pips or Points – A trader is focused on pips or points gained or lost per trade. We aren’t going to focus much on this method because it is so ridiculous. Trading is a game of winning and losing money, not points or pips, so the idea that focusing on the pips will somehow improve your performance by making you less aware of the money, is just silly. You will always be aware of the money, no matter what. Only by properly controlling your risk per trade can you control your emotions, and that means you need to know what you are risking per trade in monetary form (dollars, pounds, yen, etc).
  • Measuring based on “R” or Fixed $ Risk – A trader predetermines how much money they are comfortable with potentially losing per trade and risks that same amount on every trade until they decide to change that dollar amount. The dollar amount they are risking per trade is known as “R” where R = Risk. Reward is measured in multiples of Risk, so a 2R reward is 2 times R, etc. Yes, there is some discretion involved with this method, but honestly, discretion and gut feel in trading is a big part of what separates the winners from the losers. I will explain more as you read on…

Fact: Size doesn’t matter.

A recent study I read on what women thought was the most important feature of a man…joking! Lol. Seriously though…
Trading account size really doesn’t matter in regards to trading performance. For example, a trader with a $1,000 account might be a much better chart technician and have more self-control than a trader with a $100,000 account. So whilst the trader with the smaller account is making money and having a great trading year, the trader with the big account is losing and losing large sums of money most likely. The point is; simply having more money doesn’t make you a better trader!
In Forex, account size is truly arbitrary because a Forex account is simply a margin account, which means it’s only there to hold a deposit on a leveraged position. Any trader who understands these facts would never put ALL their trading money in their trading account because it is simply not necessary and is not as safe or lucrative as holding that money elsewhere.
The amount you fund your trading account with does not necessarily reflect all the income you have to trade and it does not reflect your overall net worth. However, in stock trading, you need a lot more money on deposit because there is less available leverage. Typically, if you want to control 100k worth of stock you need to have 100k in your account. Forex is much more leveraged as I’ve already said, and this means that to control say 100k of currency, which is 1 standard lot, you only need around $5,000 in your trading account.
Another example to help you understand this is; imagine a “rich guy” who only puts $1,000 into his account vs. a “poorer” guy who puts his entire $10,000 net worth into his trading account. Would the rich guy risk 2% and the poor guy risk 2%? Of course not! The point is that it’s really random to suggest these two traders would both risk 2% of their account balances because the account balance doesn’t take into account all factors. Risk per trade has to be a deeper thought process, it has to be personal based on circumstances and the entire risk profile and financial position of the trader.
The fixed $ risk model makes sense for professional traders who want to derive a real income from their trading; it’s how I trade and it’s how many others I know trade. Pro traders actually withdrawal their profits from their trading account each month, their account then goes back to its “baseline” level.

How much should you actually Risk per trade?

Ok, so by now you might be thinking “Nial, how do I know how much I should risk per trade?”
The answer is much less complex than what you might think. I believe in determining a dollar amount that you are comfortable with losing on any one trade, and sticking to that dollar amount at least until you have doubled or tripled your account, at which time you can consider increasing it.
This amount should be an amount that satisfies the following requirements:
  1. When risking this dollar amount, you can sleep sound at night without worrying about trades or checking on them from your phone or other device.
  2. When risking this dollar amount, you are not glued to your computer screens becoming emotional at every tick for or against your position.
  3. When risking this amount, you should be able to almost ‘forget’ about your trade for a day or two at a time if you have to…and NOT be surprised by the outcome when you check on your trade again. Think, ‘set and forget‘.
  4. When risking this amount, you should be able to comfortably take 10 consecutive losses as a buffer, without experiencing significant emotional or financial pain. Not that you would IF you’ve mastered an effective trading strategy like my 3 core price action patterns, but it’s important you allow that much buffer for psychological reasons.

Fixed $ Risk vs. % Risk

“We need to be logical, what is a true measurement of a traders performance ?”
If you’ve read my other articles on this topic, I have argued for the fixed dollar risk model and against the 2% rule, but in case you missed that lesson, I want to discuss again why I prefer the former to the latter…
The main argument I make about this topic is that although the 2% rule will grow an account relatively quickly when a trader hits a series of winners, it actually slows account growth after a trader hits a series of losers, and makes it very difficult to bring the account back up to where it previously stood.
This is because with the % R risk model you trade fewer lots as your account value decreases, while this can be good to limit losses, it also essentially puts you in a rut that is very hard to get out of. For example, if you draw down 50% of $10,000, you are at $5,000, and to get back to $10,000 you have to make 100% return, it’s a long way back to break even and then profitability using the 2% rule, because you are effectively trading a much smaller position size once you draw down that far.
This is why I say the 2% model basically leads a trader to “death by one thousand cuts”, because they tend to just lose slowly as the position size shrinks after each loss. It deflates their confidence and they end up over-trading because traders begin to think “Since my position size is decreasing on every trade it’s OK if I trade more often”…and whilst they may not think exactly that…it is often what happens.
I personally believe the % R model makes traders lazy…it makes them take setups that they otherwise wouldn’t…because they are now risking less money per trade they don’t value that money as much…it’s human nature.

Conclusion…

If you only remember one thing from this lesson, remember that the most logical way for a trader with an effective trading edge to measure trading performance or (profits) is the fixed risk or R model.
Whilst I do not recommend traders use the “2% rule” or a fixed % model, I DO recommend that you risk a dollar amount you are totally comfortable with losing on any given trade. Remember, you never know which trade will lose and which will win over any series of trades, so it’s foolish to jack up your risk on a certain trade just because you “feel” more confident about it. If the amount you’re risking per trade is keeping you awake / unable to fall asleep at night, you are risking too much, so dial it down.

Please Leave A Comment Below With Your Thoughts On This Lesson…

Sunday, February 3, 2019

Blood Rain Pattern

Description of Blood Rain Pattern: 
BEARISH two candle Reversal Pattern.
1st candle has a GREEN or Red real body.
2nd RED candle opens above previous high, and closes in the lower half of the 1st candle body or near by